> For the complete documentation index, see [llms.txt](https://docs.aqua-cloud.io/documentation/llms.txt). Markdown versions of documentation pages are available by appending `.md` to page URLs; this page is available as [Markdown](https://docs.aqua-cloud.io/documentation/product-updates-for-on-premise-customers/product-updates/2023/23.140-on-premise.md).
# 23.140 - On Premise
Guidelines
Version 23.140\
Date: 13.11.2023
## Copy a link to a folder and share it with your teammates
Useful when:
* You want to bookmark the link to a certain folder
* You want to share the link to the exact folder or subfolder with your teammate
Guidelines:
Select any folder or subfolder from the tree view and then click on the 3-dot icon
Once the context menu with the options appear, click on the ‘Copy link’ and the link to the project, folder or subfolder will be copied to the clipboard
Sort the tickets before linking them\
------------------------------------------------------------------------------------------------------------------------------------
Useful when:
* You need to quickly identify and link the most critical, time-sensitive or simply relevant tickets as dependencies based on the specific attributes
Guidelines:
Open any item and on the ribbon select what item you want to link
Then next to the column title, click once to change the sorting
After that, click the ‘Link item’ button next to each ticket you want to connect.
{% hint style="info" %}
Note: Sorting is available for any item type for each column.
{% endhint %}
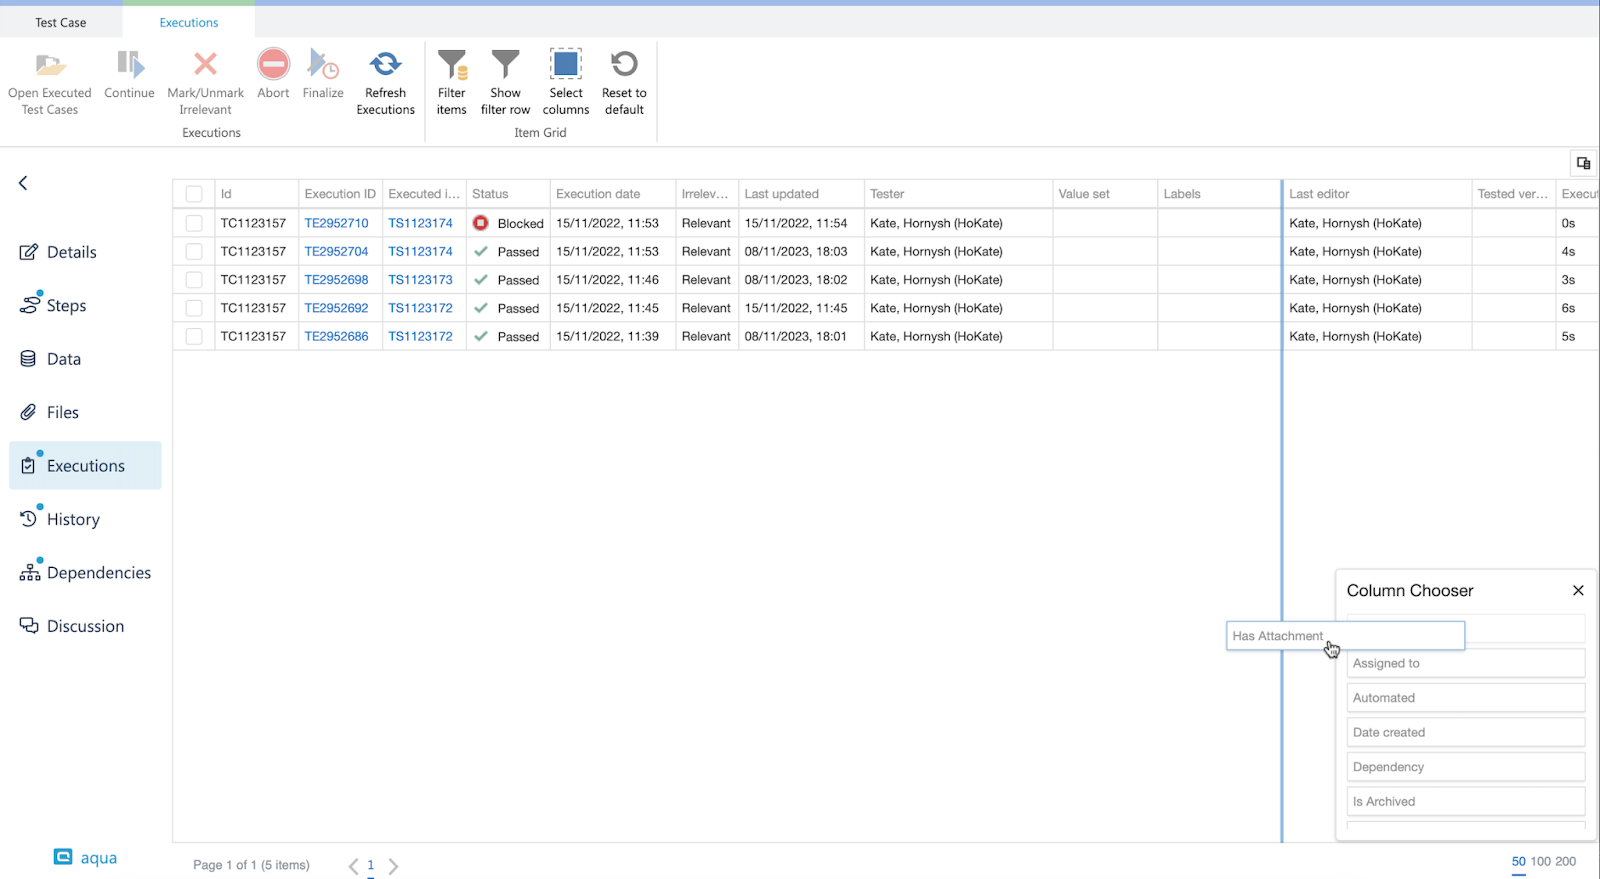
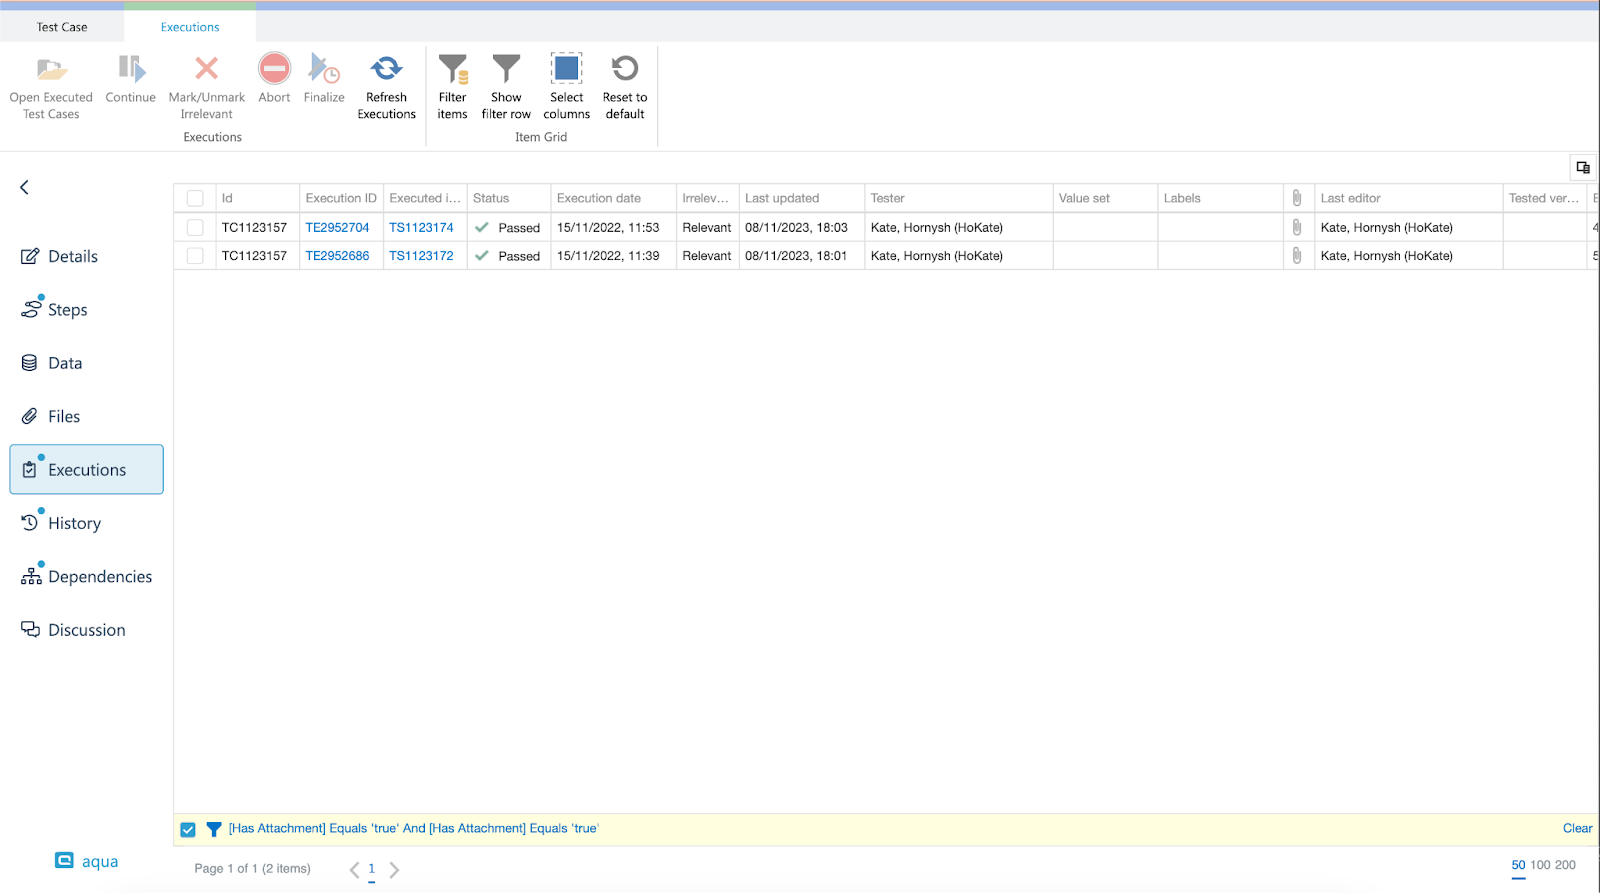
Option to add the attachment column to the test execution grid\
------------------------------------------------------------------------------------------------------------------------------------------------------------------------------------------------------------------
Useful when:
* You want to see if any attachments are associated with a specific test execution
* You want to ensure that necessary files, screenshots, or documentation are readily available and associated with each test case execution
\
Guidelines:
Open a test execution grid and then click the ‘Column chooser’ icon
Then drag and drop to the grid ‘Has attachment’ column to the grid to the most relevant place
Once the attachment is added to the test execution, you will see the icon that indicates that it has some files inside.
\
You can sort test executions by this column, or you can apply a filter to view only those test executions that either have attachments or not.
Link test scenarios to Jira issues\
------------------------------------------------------------------------------------------------------------------------------
Useful when:
* You want to provide a clear and centralized view of the progress and status testing
* It’s essential to establish a connection between test scenarios and Jira issues to enhance traceability throughout the software development life cycle.
* You need to enable your team to prioritize testing efforts based on the criticality of Jira issues
Guidelines:
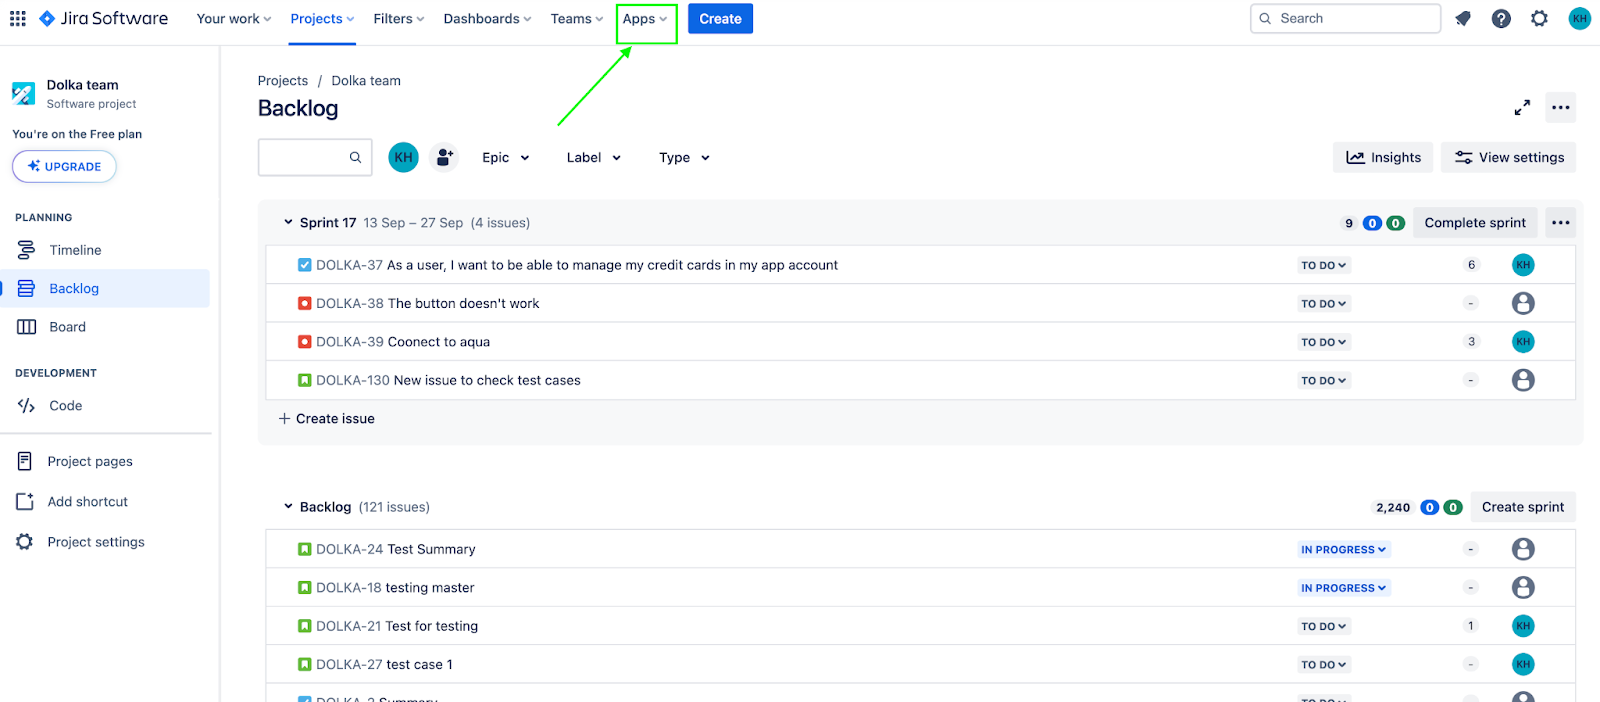
To enable test scenarios for your projects, follow these simple steps. First, begin by navigating to the 'Apps' menu and click on the 'Manage your apps.' option.
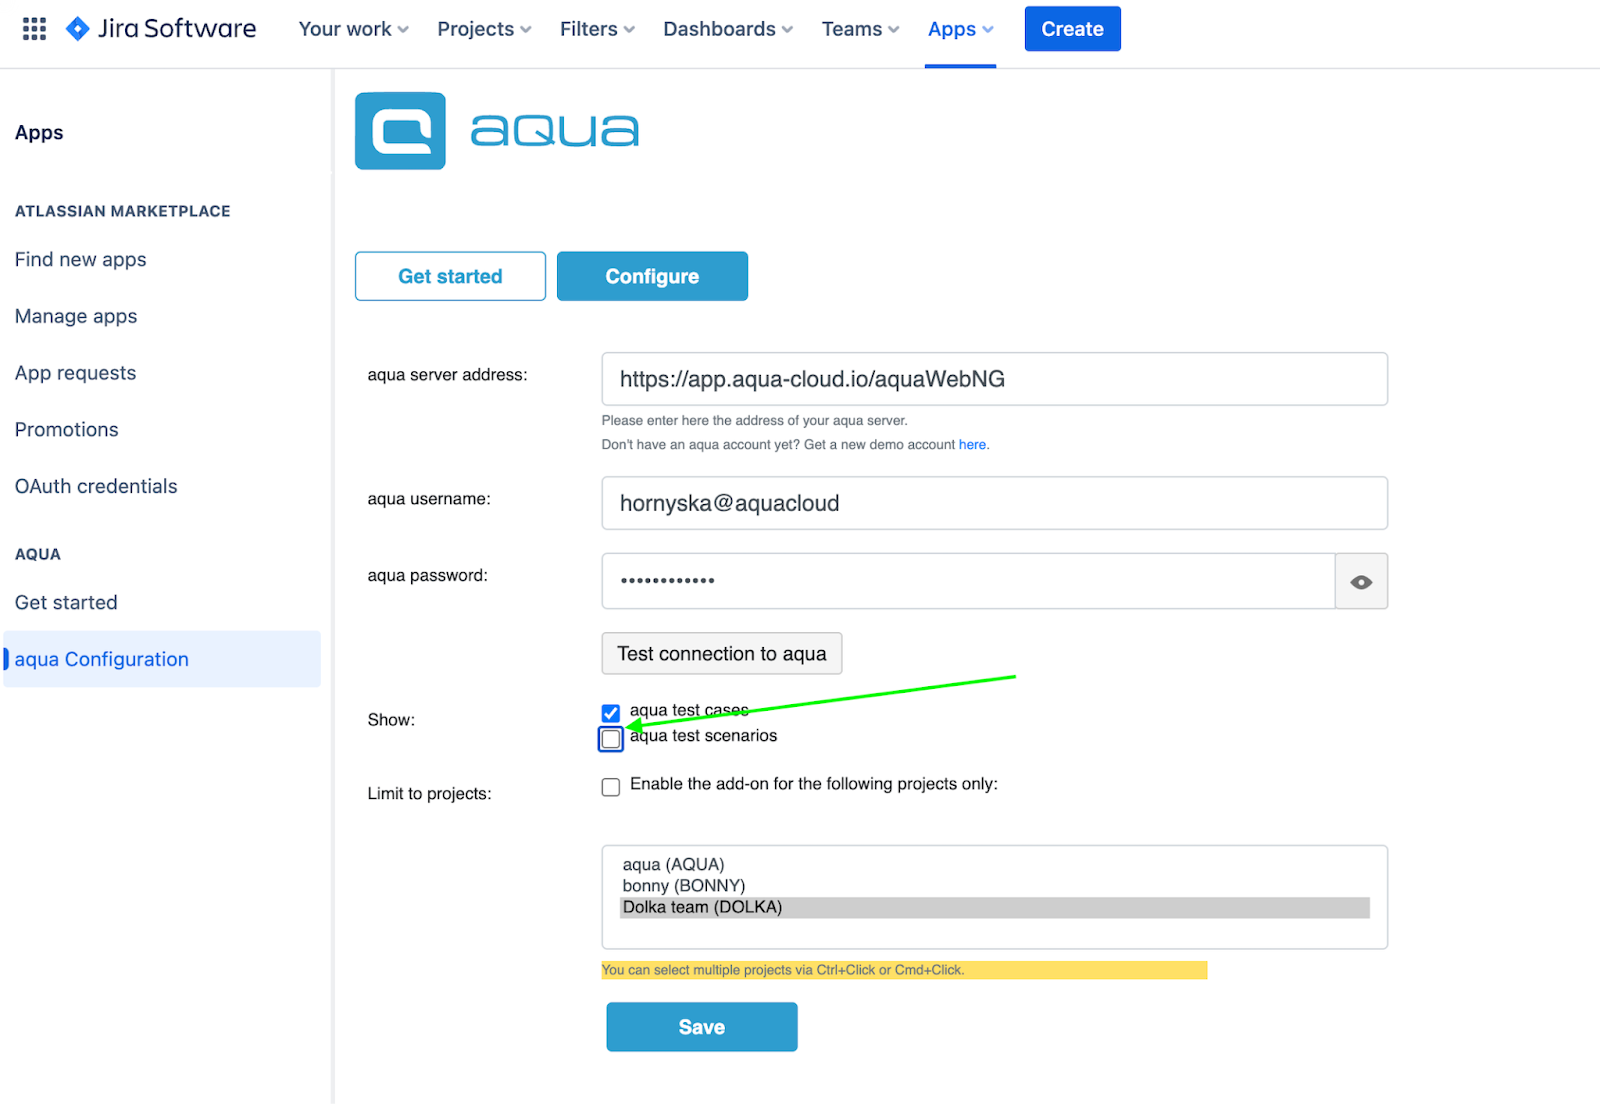
Within the sidebar, find and click on the 'aqua Configuration'.
Locate the 'Test scenarios' option and check the corresponding checkbox. Don't forget to save your changes for the configuration to take effect.
Move to your Jira issue and select 'add Aqua Test Cases' module.
Once activated, you'll be able to effortlessly link test scenarios to your user stories or bugs.
Execute your test scenarios, and you'll conveniently find all execution results neatly displayed underneath. This allows you to quickly assess the outcome of your tests.
Keep an eye out for exciting updates! While Jira currently showcases all test executions performed within a test scenario, we're thrilled to announce that the breakdown by cycles of execution will be released in the upcoming weeks. This enhancement will provide even more insightful information for your testing endeavours.
***
Want to know what's coming next? Keep an eye out for updates, as we're currently working on exciting changes that will take your testing experience to the next level.
---
# Agent Instructions
This documentation is published with GitBook. GitBook is the documentation platform designed so that both humans and AI agents can read, navigate, and reason over technical content effectively. Learn more at gitbook.com.
## Querying This Documentation
If you need additional information that is not directly available in this page, you can query the documentation dynamically by asking a question.
Perform an HTTP GET request on the current page URL with the `ask` query parameter, and the optional `goal` query parameter:
```
GET https://docs.aqua-cloud.io/documentation/product-updates-for-on-premise-customers/product-updates/2023/23.140-on-premise.md?ask=&goal=
```
`ask` is the immediate question: it should be specific, self-contained, and written in natural language.
`goal` is optional and describes the broader end goal you are ultimately trying to accomplish on behalf of the user. GitBook uses it to tailor the answer towards what is most useful for that goal.
The response will contain a direct answer to the question and relevant excerpts and sources from the documentation.
Use this mechanism when the answer is not explicitly present in the current page, you need clarification or additional context, or you want to retrieve related documentation sections.