> For the complete documentation index, see [llms.txt](https://docs.aqua-cloud.io/documentation/llms.txt). Markdown versions of documentation pages are available by appending `.md` to page URLs; this page is available as [Markdown](https://docs.aqua-cloud.io/documentation/product-updates-for-on-premise-customers/product-updates/2023/23.70.0-on-premise.md).
# 23.70.0 - On Premise
Guidelines
Version 23.70\
Date: 10.07.2023
### New aqua home page
\
With the new aqua home page, you can get much easier access to all aqua offerings, partners and products. You can also find documentation or contact our customer support here. \
\
What needs to be done to configure it:
{% hint style="warning" %}
If you show internal resources instead of aqua news page please ensure that you have added in the aquaWebNG.config file the following key including your custom URL:\
i.e. AQUA\_HOME\_HOMEPAGE\_URL: ;
{% endhint %}
{% hint style="success" %}
If you show the aqua news page, then once you install the new version of aqua, no special actions are required from your side. The new page will be shown automatically.
{% endhint %}
### New UI: Redesigned Navigation page
### Quick actions panel
Useful when:
* You need an easy access to the most frequently used options
* You want to know what item you are creating and on what tab you are right now
\
Guide:
To create a new item, folder or project, hover over the button and select one of the available options from the dropdown menu.
Alternatively, you can navigate to any of the item type tabs, and clicking the New button there will automatically create an item of the same type. This means that you can create new items with minimal clicks, saving you valuable time and effort.
\
To copy a link or modify an item, select one or more items on the grid, and click on one of the available quick actions.\
\
For even more options, head over to the 3-dot menu or use the context menu.
If you want to see changes in the last few seconds or see the latest test execution, click on the Refresh button to update the grid.
### New search module
Useful when:
* You want to search for specific information within the project
* You need to see all items that contain key words in one go
* You want to filter items that meet the search criteria and show them on the grid
\
Guide:
To search for an item at the project level, enter a keyword into the search box and press the Enter key. By default, the system will begin searching for items that meet the specified criteria within the project.\
\
If you wish to search for tickets within a specific item type, you may select that type from the dropdown menu prior to initiating the search. Similarly, if you wish to filter results that are of the specific item type, you may select it from the dropdown after results for all types of items have been returned.
Once the items are found, you can open one of them from the pop up by clicking on the title. If you want to check a group of items and apply the filtering next, then click on *Show on the grid* and the items will be filtered and displayed.
To reset the list on the navigation screen, simply clear the search box by clicking on the cross. \
For your convenience, we also added a shortcut to trigger search and added 5 recent searched words, making it easier for you to find items in no time.
### Filtering
Useful when:
* You want to see what filters are applied to the grid
* You need to granulary change the applied filtering
* You want to apply filtering and then create a custom view
Guide:
In the old version of aqua, filters were located on the ribbon in the *Item grid* group. But in the latest version, we've moved filters to a separate group closer to the grid. This makes it more convenient for you to view subsets of the information displayed.
To view a subset of the information that is currently displayed, click on the *Filter* button and select one of the available options.
Select the *Filter row* option to display items that meet specific criteria for a given column or use *Add filter* for more advanced filtering scenarios.
Once you applied a filter, all the criteria you had selected will be displayed at the top of the grid, making it easy for you to see what filters are active.
If you need to remove a filter, simply click on the 'x' next to the filter label. The other filters will remain active.
### Grid and columns
Useful when:
* You want to see what columns are active before you modify the grid
* You need a quick access to the column picker to add additional options to the grid via a shortcut
Guide:
In the old version of aqua, you had the option to add a column or reset to default the grid view only from the ribbon.
\
Now, these features are easily accessible from the *Views* section, making customisation even more straightforward!
\
To customise the grid view, for example add or hide columns, simply click on the *Views* button. From there, you can quickly customise your grid.\
At the top of the panel, you'll find a group of default columns along with any custom columns you've added.
\
To add a specific column, click on the plus button or use a shortcut to enable the column picker.\
Besides, the old column picker can be called with a shortcut even when the panel is closed. \
If you want to return the initial look and feel of the grid, click on ‘Reset to default’.
\
To hide the column, click the corresponding label. It will be removed from the grid.
{% hint style="info" %}
Note: Default column labels are always visible on the panel, while custom columns’ labels are hidden from it once you disable them.
{% endhint %}
### Show Archived and Subfolders
Guide:
These two options are now part of the *Views* as well.
If you want to view archived items, folders or projects, click on the toggler to display them.You will need a similar toggle to show/hide items from the subfolders on the grid view when a project is selected.
### Views
Useful when:
* You want to customise your grid view and create a personalised layout that works for you and your team's needs.
* You need to organise and quickly access information within the grid view, making it easier to work more efficiently.
* You want to collaborate with team members by sharing your views, making it simpler to work together on projects.
Guide:\
\&#xNAN;*Views* have become easier to create, use and modify. They moved from the ribbon to the panel, too.
To add a new view, simply enable the 'View' panel above the grid and click on the *Add view* button. Provide a title, colour, and description, and specify what you want to display. Once you save the view, it will automatically be applied to your grid.
Your newly created view can be found under *My views*, where you can easily modify or make it public, so that other team members within your project will be able to use this view but not modify it.
### Preview details of the item
Useful when:
* You want to see the context for the item
* You need to quickly preview details or items related to the ticket
* You want to see linked items and the details of a ticket in a tree view
Guide:
The options to see different types of the item details are moved to the item preview block.\
When you need to preview specific information, click on the item and then switch between the tabs below.
To preview related items in a different mode, click on the dependency and then pick the needed view. Graph view is set by default to quickly see high-level information. In case you want to check in more details linked defects, test scenarios or Jira issues, switch to the *Tree* view by clicking on the corresponding item.
{% hint style="success" %}
aqua tip: If you want to add more columns to the dependency tree view, navigate to the item and add the column. It will be automatically added to the preview.
{% endhint %}
### Open item via clicking on the title or the ‘Open’ button
Guide:
To open the item which you would like to check more deeply, simply click on the title or click the *Open* button on the preview page block.
\
Save and Run buttons in Step Designer
Useful when:
* You want to quickly save the changes to the test case without leaving the tab
* You want to start executing a test case from the step designer page once you created ticket or modified it
Guide:
Create a new or open an existing test case, then make some changes to it. Without leaving the step designer tab, save the recent changes.
\
Once the edits are saved, you can launch execution by clicking the *Run* button right from the step designer tab.
### Jira | Improved flows for connecting Jira issues with aqua test executions and aqua items
Useful when:
* You want to connect an already existing Jira issue to the test execution
* You want to create a Jira issue from aqua item and add it as a dependency
* You want to connect multiple Jira issues at once to aqua test execution or aqua items
Guide:
To connect existing Jira issues to aqua tickets, you need to set up the integration with Jira first. Follow this guide to get started in less than 5 minutes. \
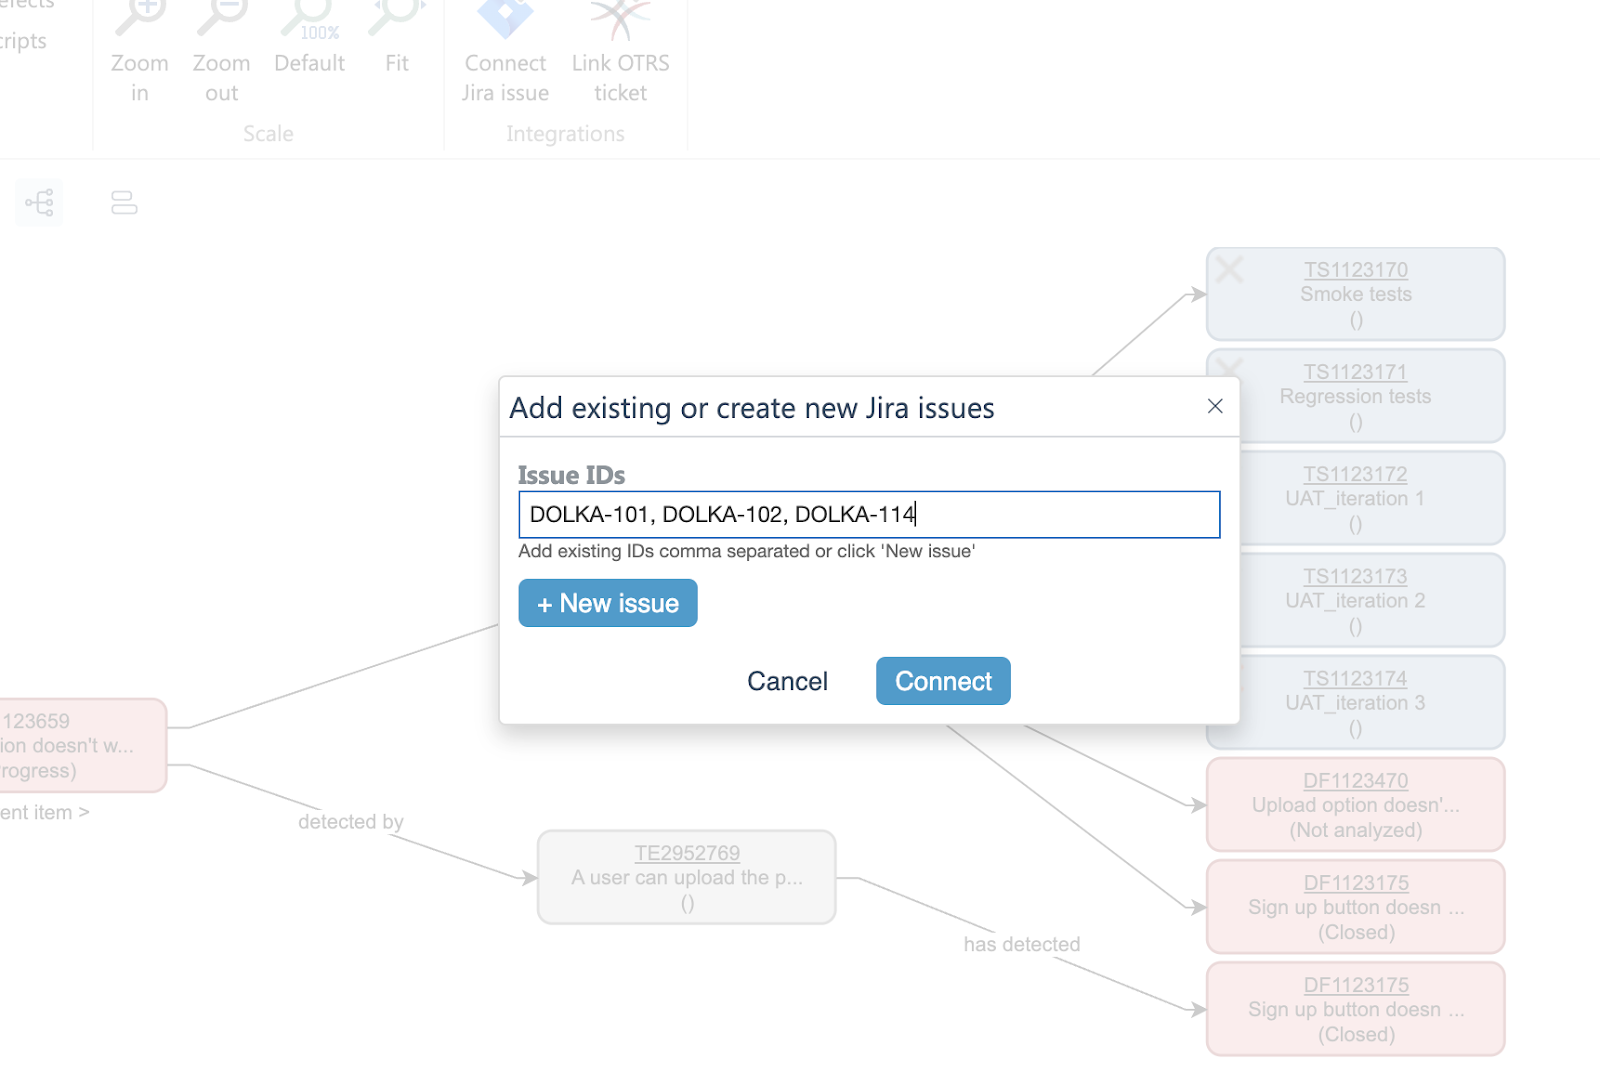
Once the integration is in place, open the desired aqua item, navigate to the ‘Dependencies’ tab, and then click the ‘Connect Jira issue’ button.
\
When the popup opens, provide the IDs of the Jira issues (separated by commas) and then click the ‘Connect’ button.
All referenced issues will be linked to the target aqua item.
{% hint style="info" %}
Please note, there is a limit of 10 IDs that you can provide at once. You will be able to link more items by going through the same steps again.
{% endhint %}
\
In case you want to create a new Jira issue and link it to the aqua item, just click the ‘New issue’ button and, once you save it on the Jira side, go back to aqua and provide the ID.\
\
You can use the same flow to connect multiple existing or new Jira issues to aqua’s test executions. Just click the same ‘Connect Jira issue’ button on the test execution or test execution details page.
### Ranorex | Handle links in project to external files in Ranorex scripts
Useful when:
* You want to link to external files in your project in Ranorex scripts
Guide:
In Ranorex Studio, open the desired project and navigate to the script's subfolder. Then right-click the subfolder and select the ‘Add’ option.
\
From the context menu, pick ‘Existing item’ and, once you select the file, click the ‘Link’ button.
{% hint style="info" %}
Please note: when you link external files to multiple projects, you need to remember that it’s now dependent on the linked files that are not managed by aqua. As a user, you need to make sure that these files are located in the same place where they were originally linked from.
{% endhint %}
For example, if you developed the script on machine A, the linked file must be accessible in the exact same location on machine B in order to run the script there. aqua only establishes the link to the file and doesn't handle actual access to the file.
In case you don’t have these feature guidelines at hand in the future, we got you covered. You can find all the information on the new features in our [aqua wiki](/documentation/web-client/getting-started.md)[.](/documentation/web-client/getting-started.md)
We continue to make aqua beneficial and easy to use. The upcoming releases will bring both new powerful features and user experience improvements, and we can’t wait to share them with you.
:raised\_back\_of\_hand:In the meantime, let us know if you have any questions or share feedback at support\@aqua-cloud
---
# Agent Instructions
This documentation is published with GitBook. GitBook is the documentation platform designed so that both humans and AI agents can read, navigate, and reason over technical content effectively. Learn more at gitbook.com.
## Querying This Documentation
If you need additional information that is not directly available in this page, you can query the documentation dynamically by asking a question.
Perform an HTTP GET request on the current page URL with the `ask` query parameter, and the optional `goal` query parameter:
```
GET https://docs.aqua-cloud.io/documentation/product-updates-for-on-premise-customers/product-updates/2023/23.70.0-on-premise.md?ask=&goal=
```
`ask` is the immediate question: it should be specific, self-contained, and written in natural language.
`goal` is optional and describes the broader end goal you are ultimately trying to accomplish on behalf of the user. GitBook uses it to tailor the answer towards what is most useful for that goal.
The response will contain a direct answer to the question and relevant excerpts and sources from the documentation.
Use this mechanism when the answer is not explicitly present in the current page, you need clarification or additional context, or you want to retrieve related documentation sections.