> For the complete documentation index, see [llms.txt](https://docs.aqua-cloud.io/documentation/llms.txt). Markdown versions of documentation pages are available by appending `.md` to page URLs; this page is available as [Markdown](https://docs.aqua-cloud.io/documentation/product-updates-for-public-and-private-clouds-customers/product-updates/2023/23.92.0-public-and-private-clouds.md).
# 23.92.0 - public and private clouds
Get details on release 23.92.0 updates for public and private clouds, including feature enhancements and changes. Stay informed on the latest improvements for your cloud environment.
Guidelines
\
Version 23.92\
Date: 23.08.2023
### aqua AI Copilot: Turbocharged Text Editing
Useful when:
* You want to reduce the time and effort spent on refining the text
* You need to maintain a consistent tone and language across your documentation
* You have run out of ideas or looking for some inspiration
* You want to improve the overall quality of your content, fine-tune sentences, improve clarity, and suggest alternative phrasings, making your text more engaging and effective
* You lack some technical background and need assistance in creating polished content across various contexts
Guide:
\
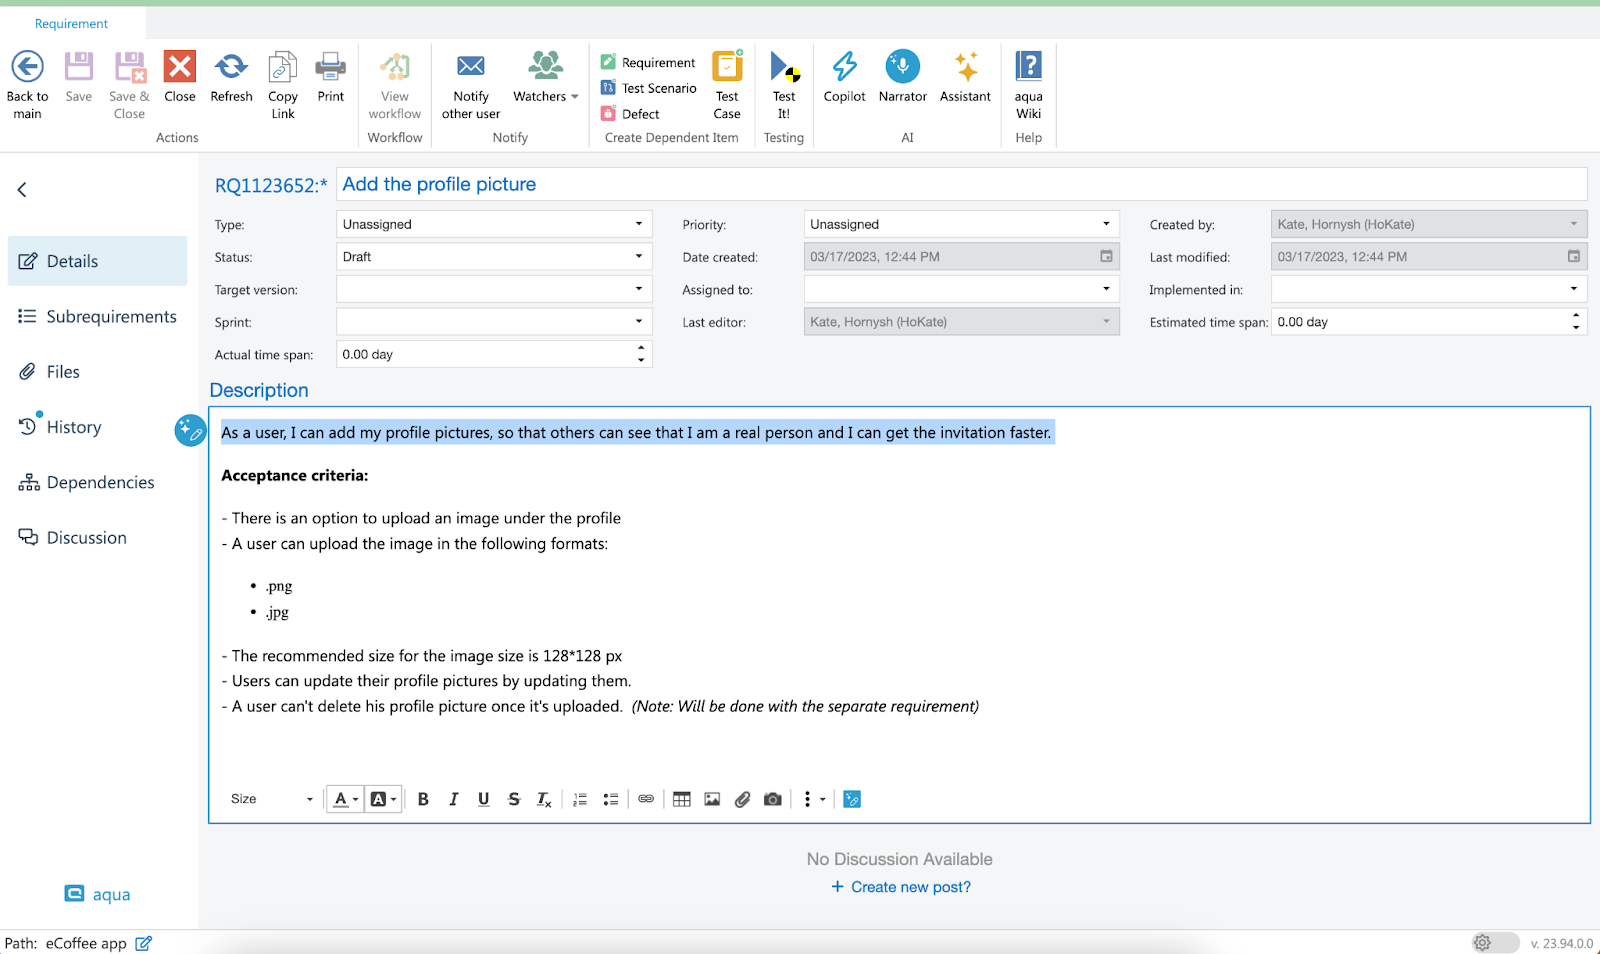
Add some text or open an existing item that already has some content, then select a sentence or a paragraph you want to modify.
As soon as the text is selected, the AI Copilot icon will appear next to it.
Then, click on the icon. You’ll see a dialogue where you can put your custom prompt for AI Copilot or choose one of the pre-selected options.
Within a few seconds you’ll receive the improved text. You can either replace the old text or add the new one below for further comparison or adjustments to both later.
It’s also possible to regenerate the text to get better results or provide some custom instructions if the result doesn’t fit your expectations.
Note: AI Copilot currently works with English text only, but in the upcoming release we will add support of the German language too.
### Linked Jira Issues in Reports: Know more!
\
Useful when:
* You are using aqua and Jira and want to create a comprehensive report for your stakeholders to provide update on the project's status
* You need to see Jira issues in the reports after test runs are done for the audit purposes
Guide:
Navigate to the ‘Reports’ page and either select the report you want to modify or create a new one. Then, at the ‘Edit properties’ step, select when you want the Jira issue to be loaded
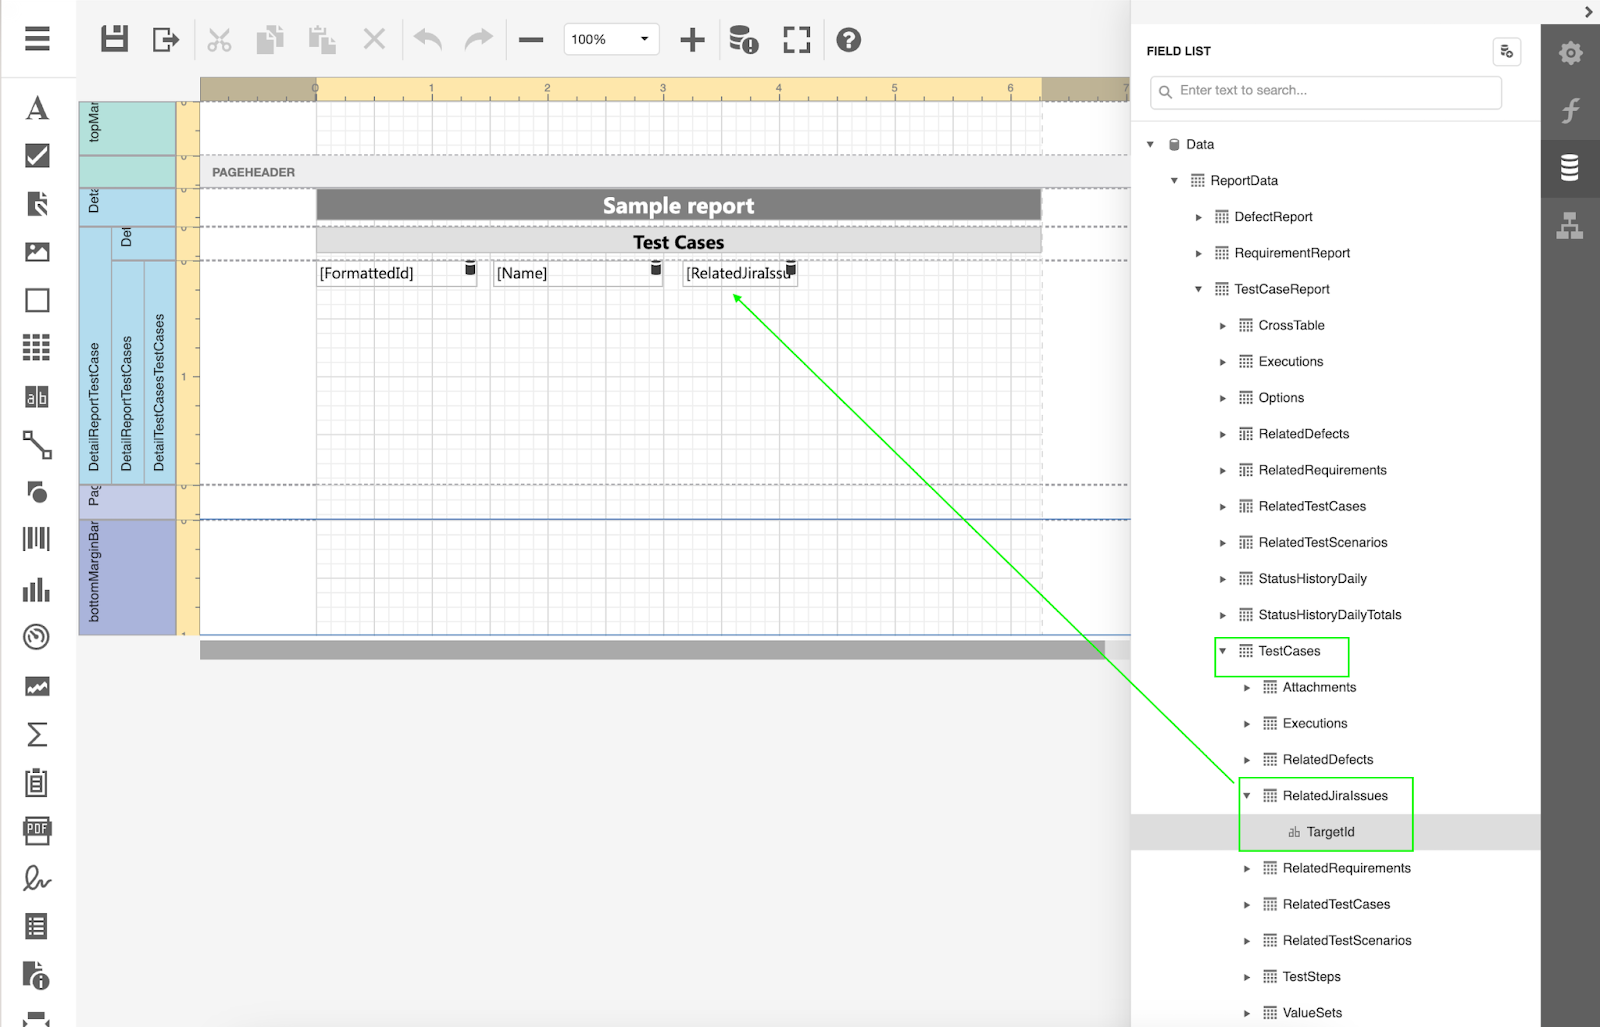
Go back to the layout step, navigate to the following group, and add the label to your layout.
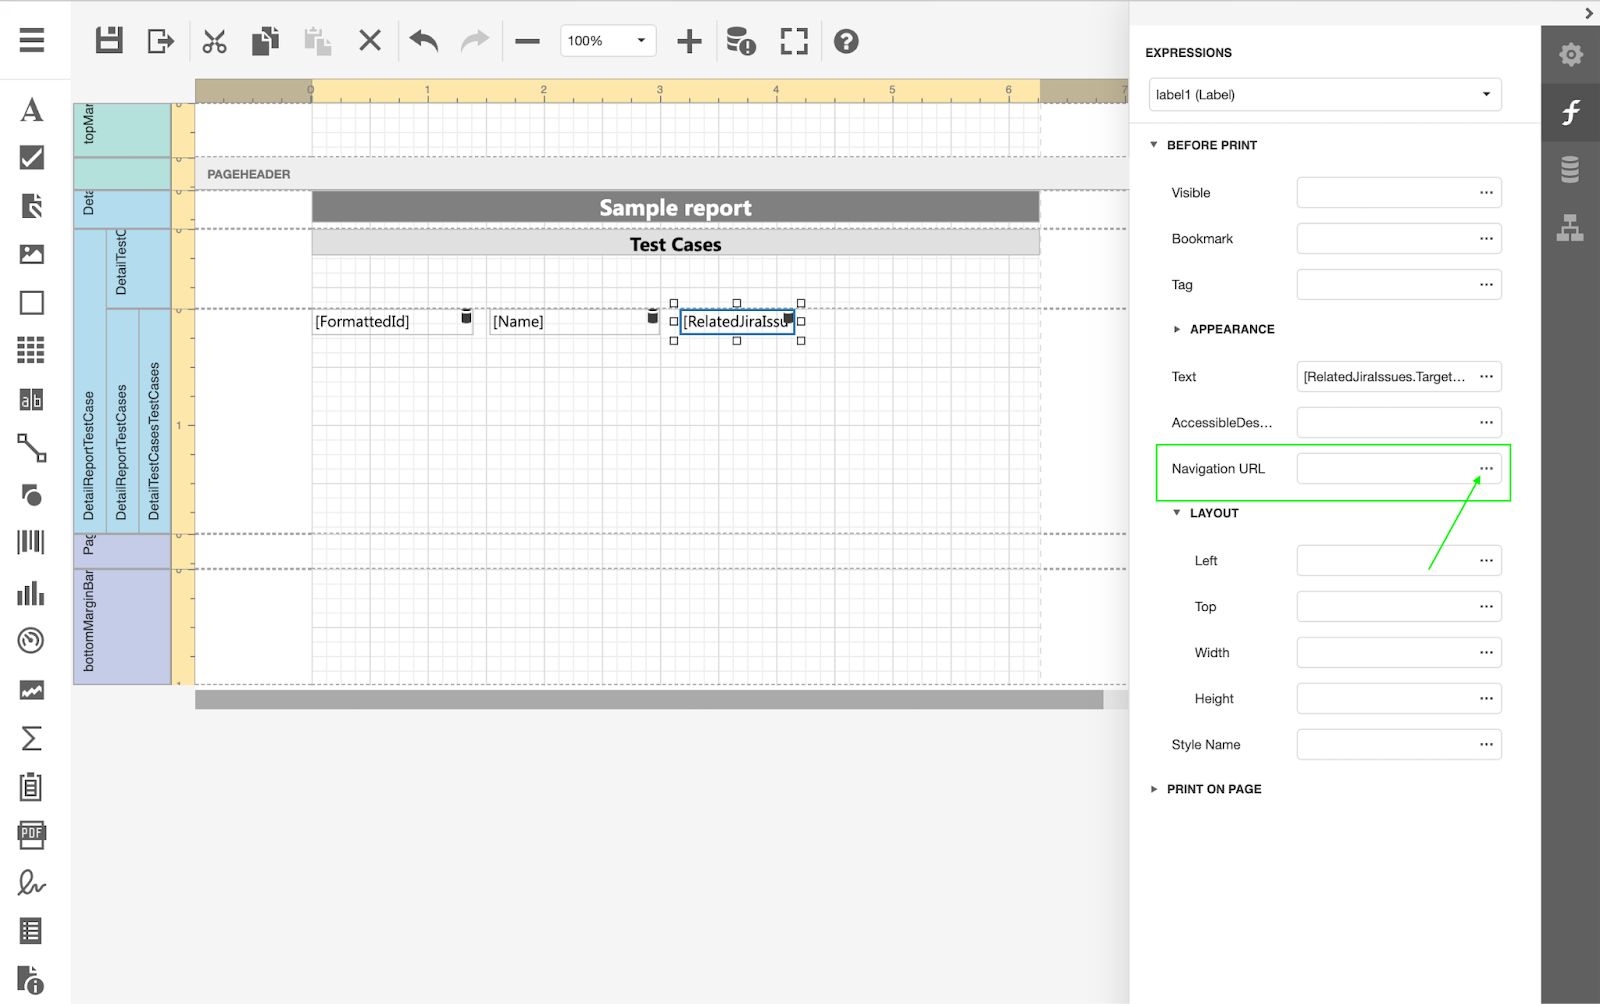
You can also reference a link to the Jira issue. To do so, click on the added label and once the expression sidebar opens, click on the 3-dot menu next to the ‘Navigation URL’ field.
\
Add your base Jira URL to the issues, with apostrophes before and after the URL. Then, add plus and navigate to the ‘Fields’ section, select ‘JiraRelatedIssues’ and doubleclick on ‘TargetId’, and save the report.
Once you generate the report, there will be a link to the Jira issue that is linked with your aqua test case or any other item you referenced in the report.
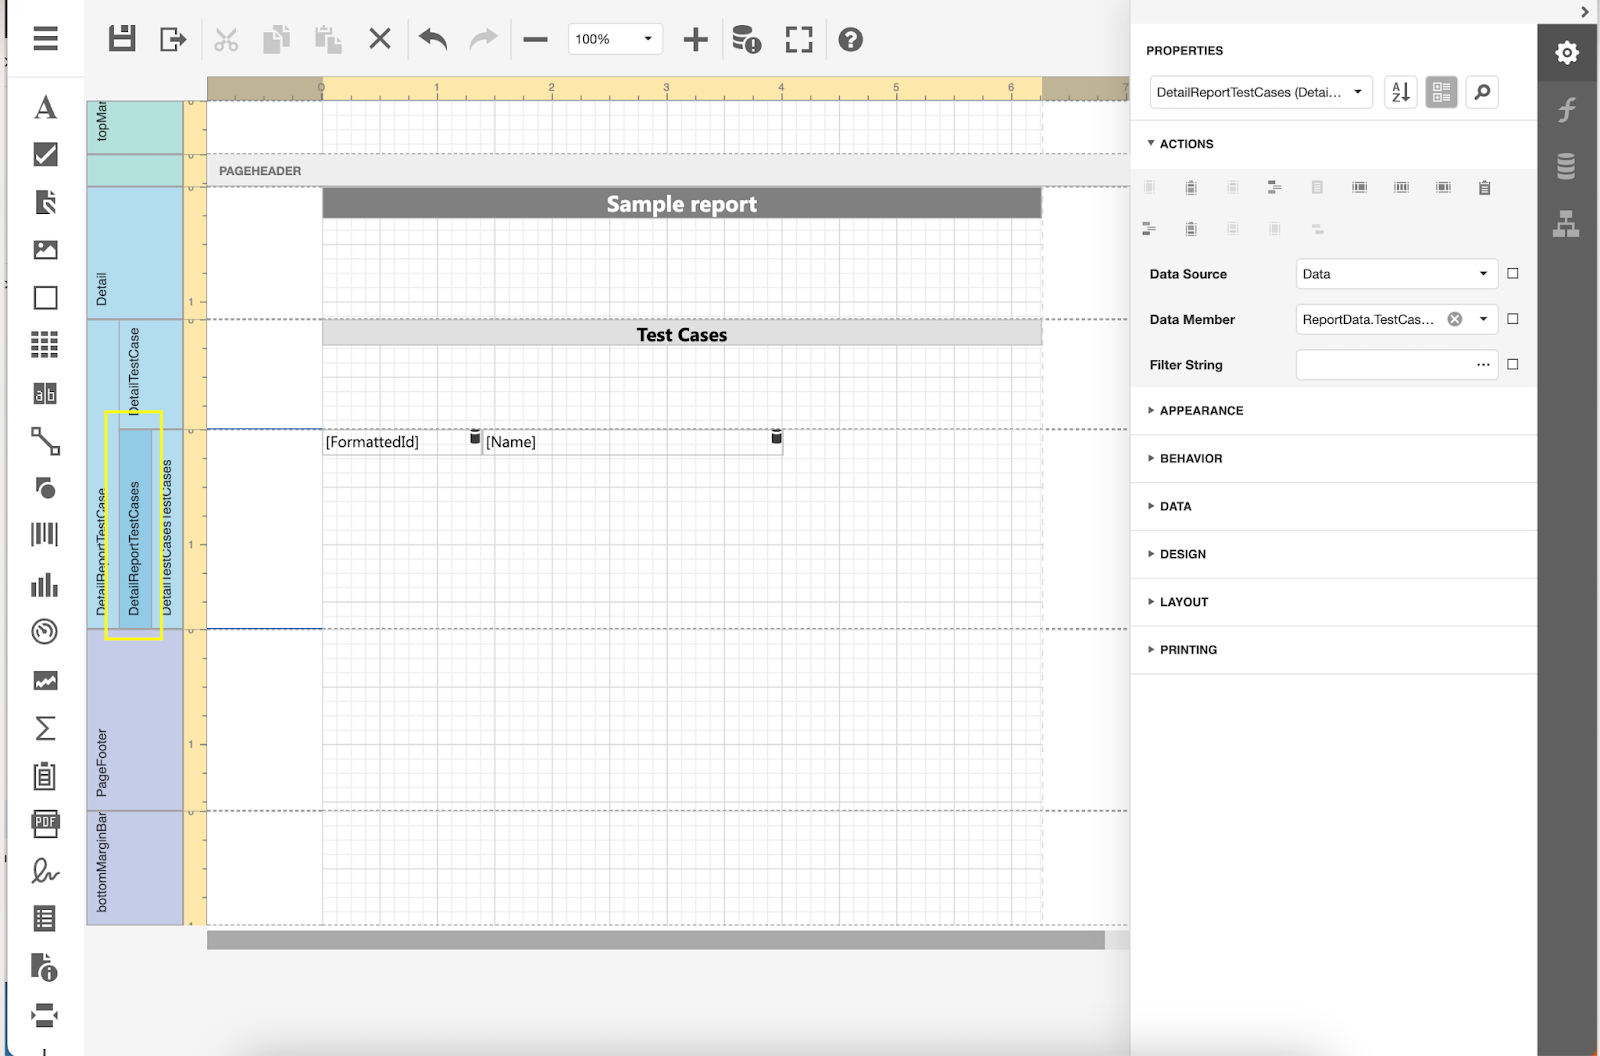
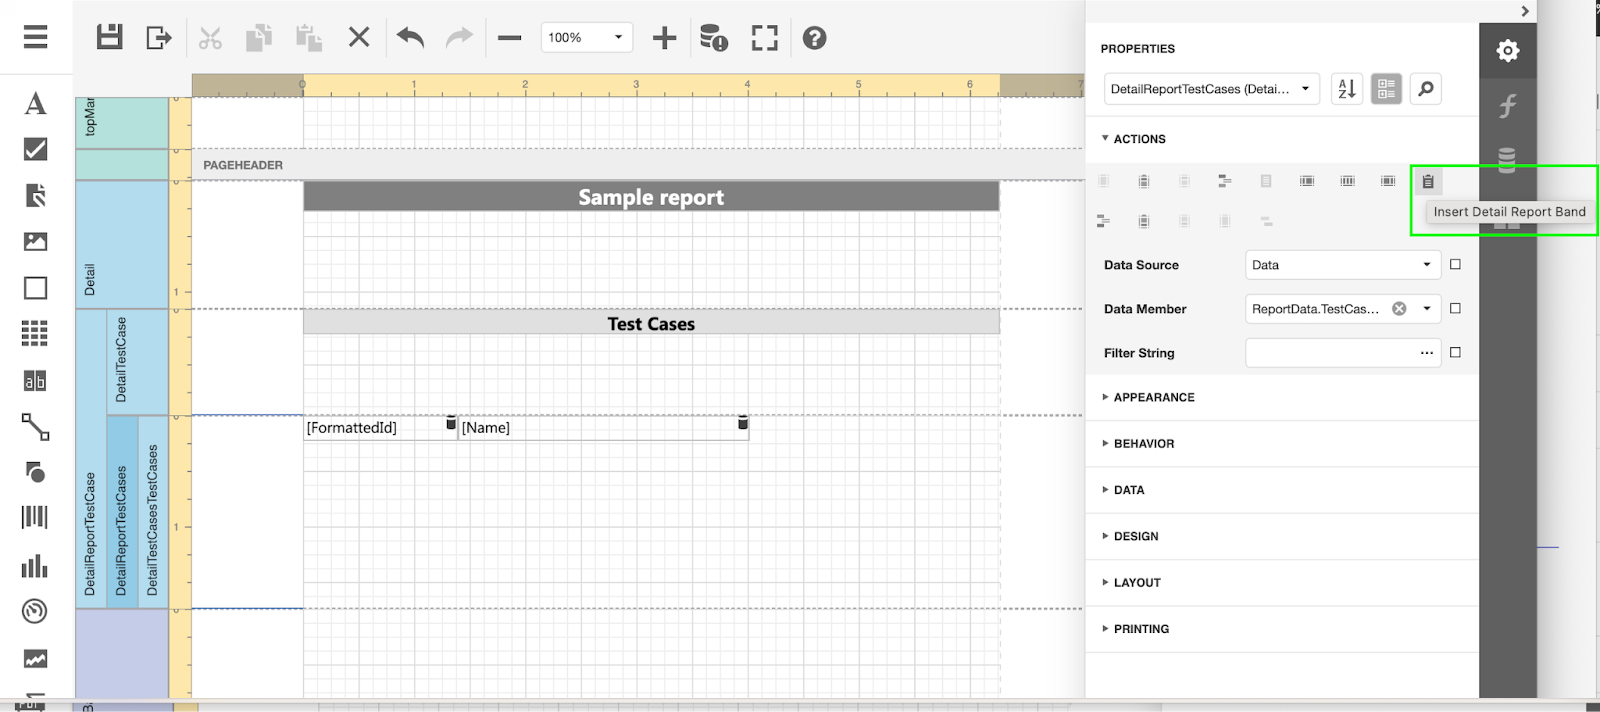
If you want to include multiple Jira issues, click on the ‘DetailReport \[itemtype] section when creating the report.
On the ‘Properties’ sidebar under the ‘Actions’ group, click on the ‘Report Band’.
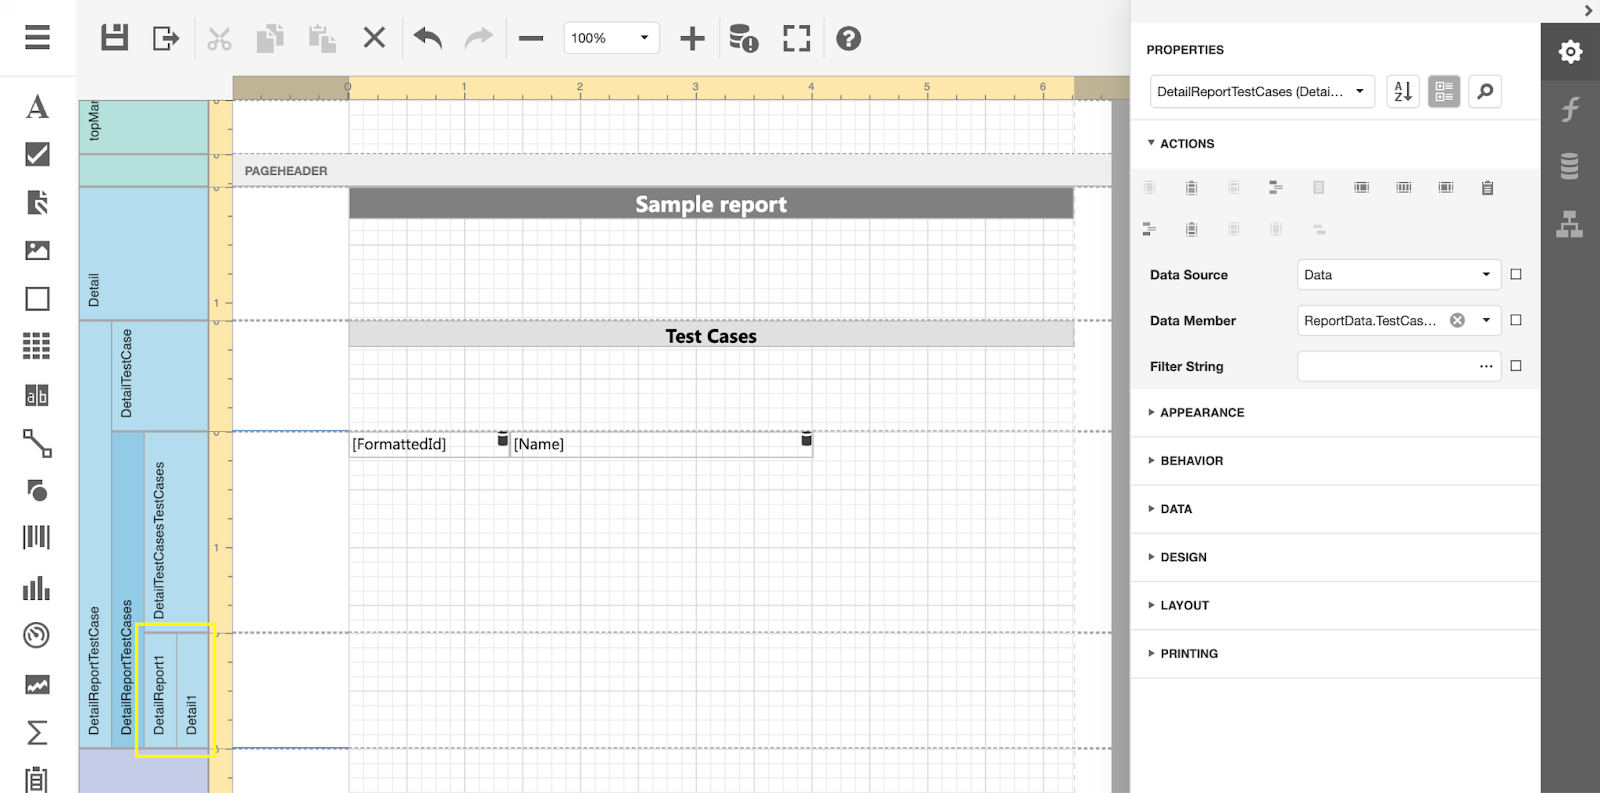
Once you do that, the new block will be added to the layout.
For ‘Data Source’, select the ‘Data’ property; for ‘Data Member’, select the ‘Related Jira issues‘ property.
Now, select ‘DetailReport1’ and drag and drop e.g. table to the page.
Leave as many cells as you need, then go the Field list’, select ‘Test cases’ => RelatedJiraIssues and then drag and drop to the cell ‘TargetId’
Save your report and once you generate it, all linked Jira issues will be included into your report.
### Test Execution: Your Choice, Your Pace
Useful when:
* You want to resume an incomplete test and pick up right where you left off, ensuring that the effort already invested in the test is not wasted
* You want to ensure that there are no unfinished text executions and user don’t populate unnecessary runs
Guide:
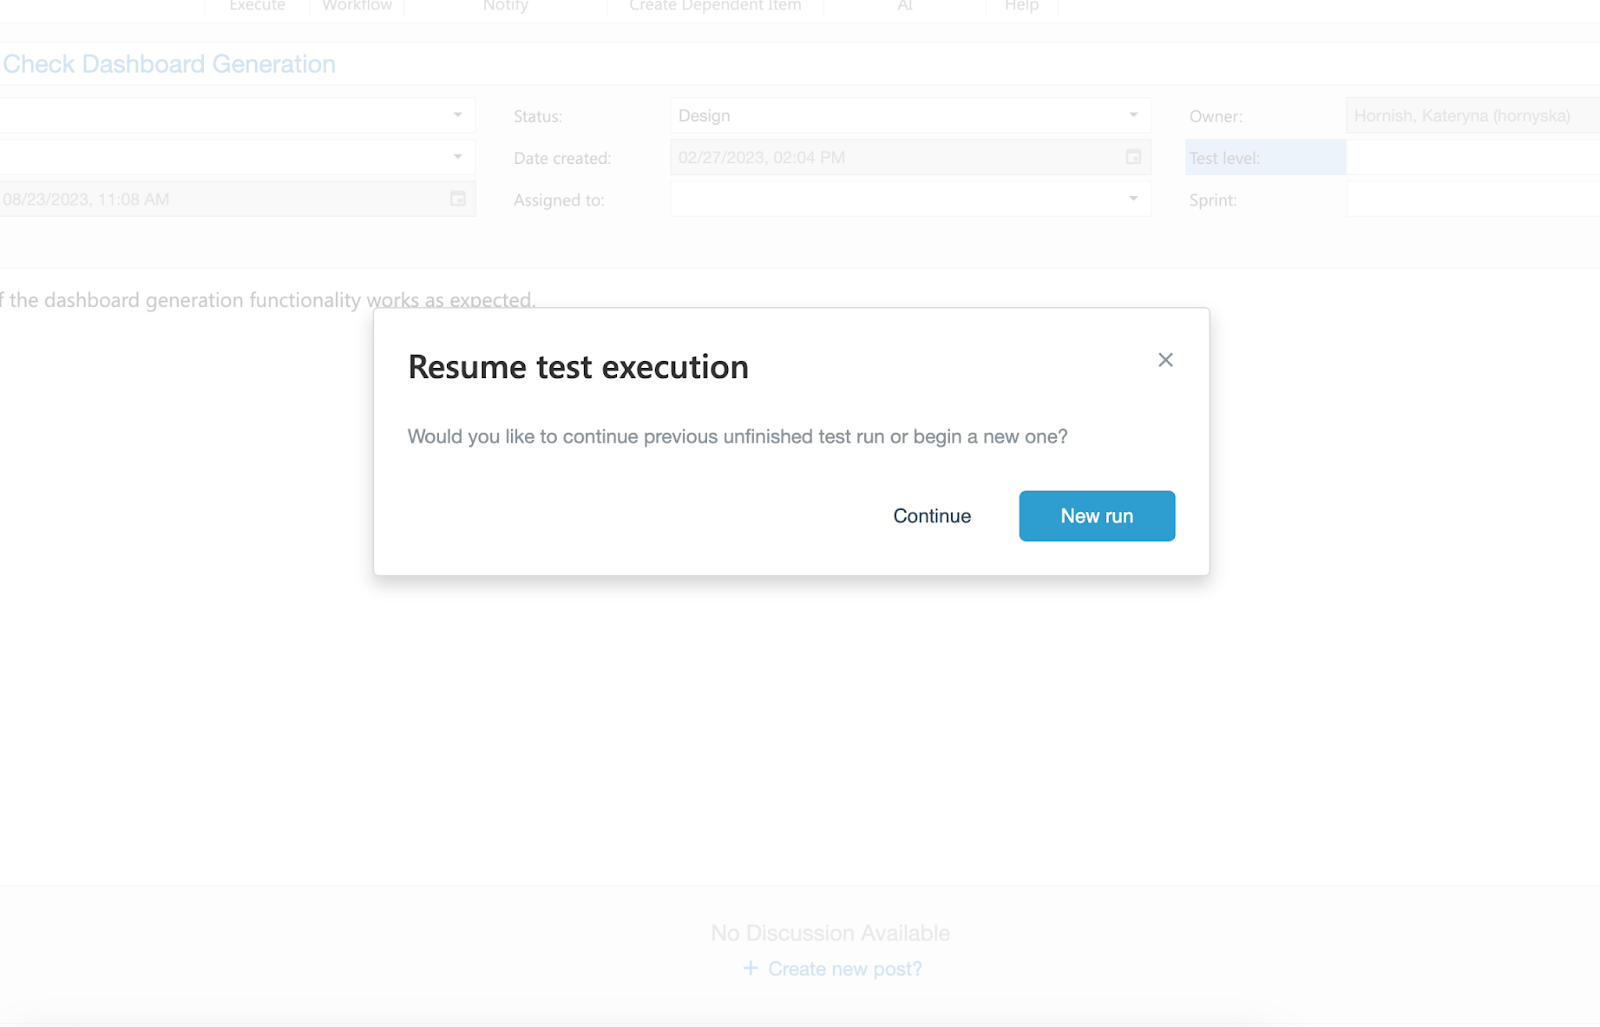
From now on, aqua will automatically prompt you once there is a previous unfinished test execution.
Just press the ‘New Run’ button and you’ll see the pop-up. Select ‘Continue’ if you want to resume the previous run. In case you want to start a new one, just click ‘New run’
{% hint style="info" %}
Please note: aqua will show you this pop up only if the last test execution is not completed. It won’t be shown in case you have old recorded uncompleted test executions.
{% endhint %}
### Dashboard Bliss: Fresh Look, Effortless Management
\
Benefits:
* The enhanced dashboard design: you now have the power to create new charts from multiple locations with ease.
* Everything you need is thoughtfully organized in header, sidebar and dropdowns, making it a breeze to find and use.
Guide:
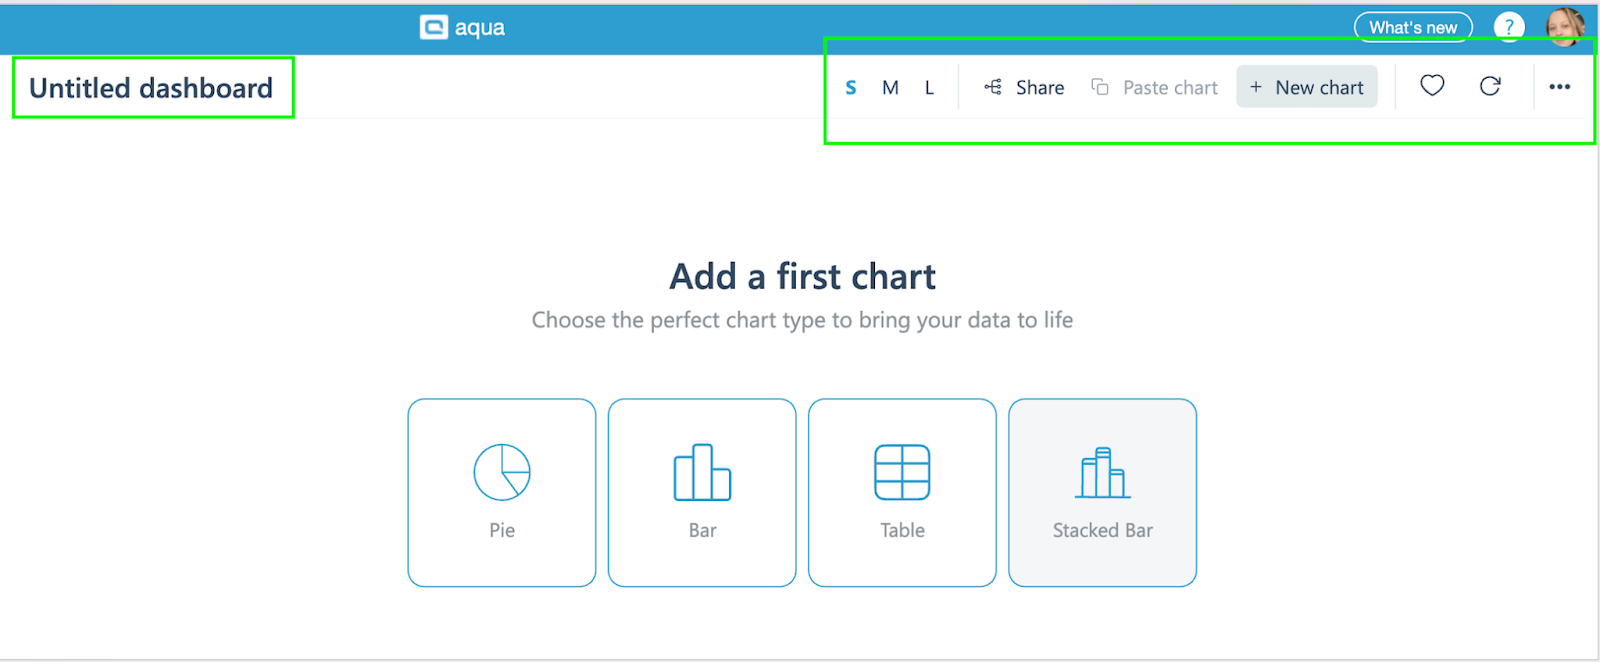
Create the dashboard from multiple locations by clicking the corresponding option
\
Select the type of the chart you want to create and connect the data to display afterwards.
All main options are logically grouped at the header and easily accessible for you whenever you need to update the title, change the size of the chart, share it or copy and add to another dashboard.
With the next release we will introduce the new look and feel of the charts, so stay tuned for the updates.
### Single Tab Ticket Management: Tab-tastic Efficiency
Useful when:
* You are annoyed by juggling multiple tabs to access different items and want to open the item in the same tab
* You want a clutter-free window and ease navigation between the tabs
* You need to easily navigate to the main page whenever it’s needed and save time on opening the new tab with aqua navigation page
Guide:
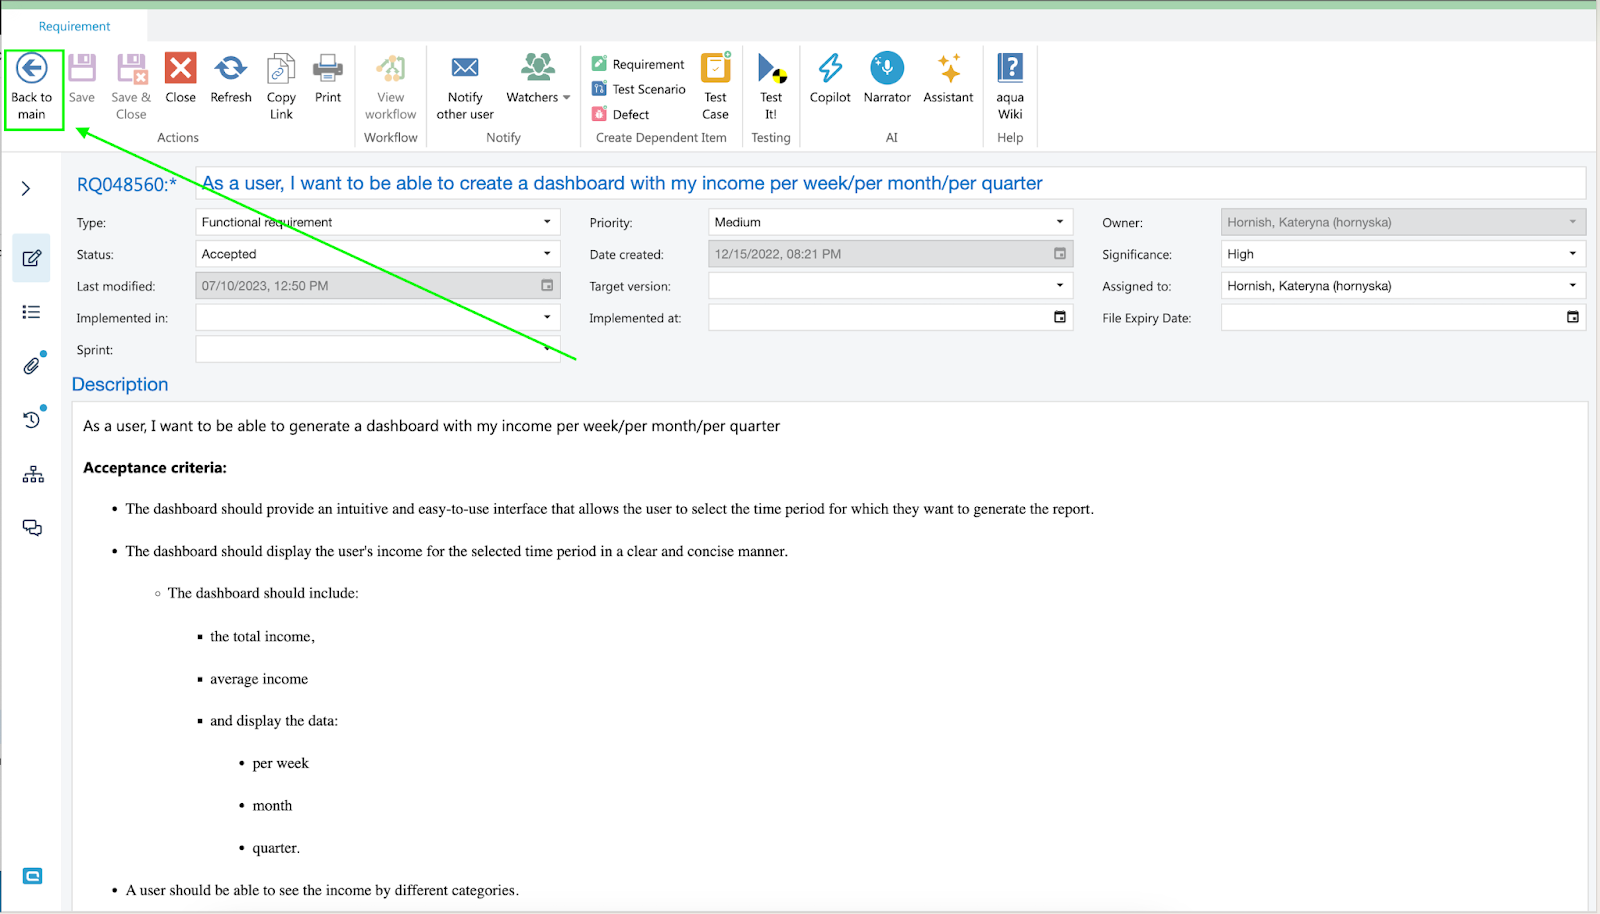
Whenever you need to open the item, just do it the same way as you did before: either click on the item title or the ‘Open’ button.
The ticket will open in the same tab without populating separate tabs.
In case you need to go back, just click the ‘Back to main’ button, and you’ll get back to the ‘Navigation’ page.
\
When you need to open multiple items, just click on the item and click on the ‘Open in a new tab’ option in the context menu.
### Drag and Drop Columns: Effortless Navigation Tweaks
Useful when:
* You want to easily add the column to the exact place to the item grid
Guide:
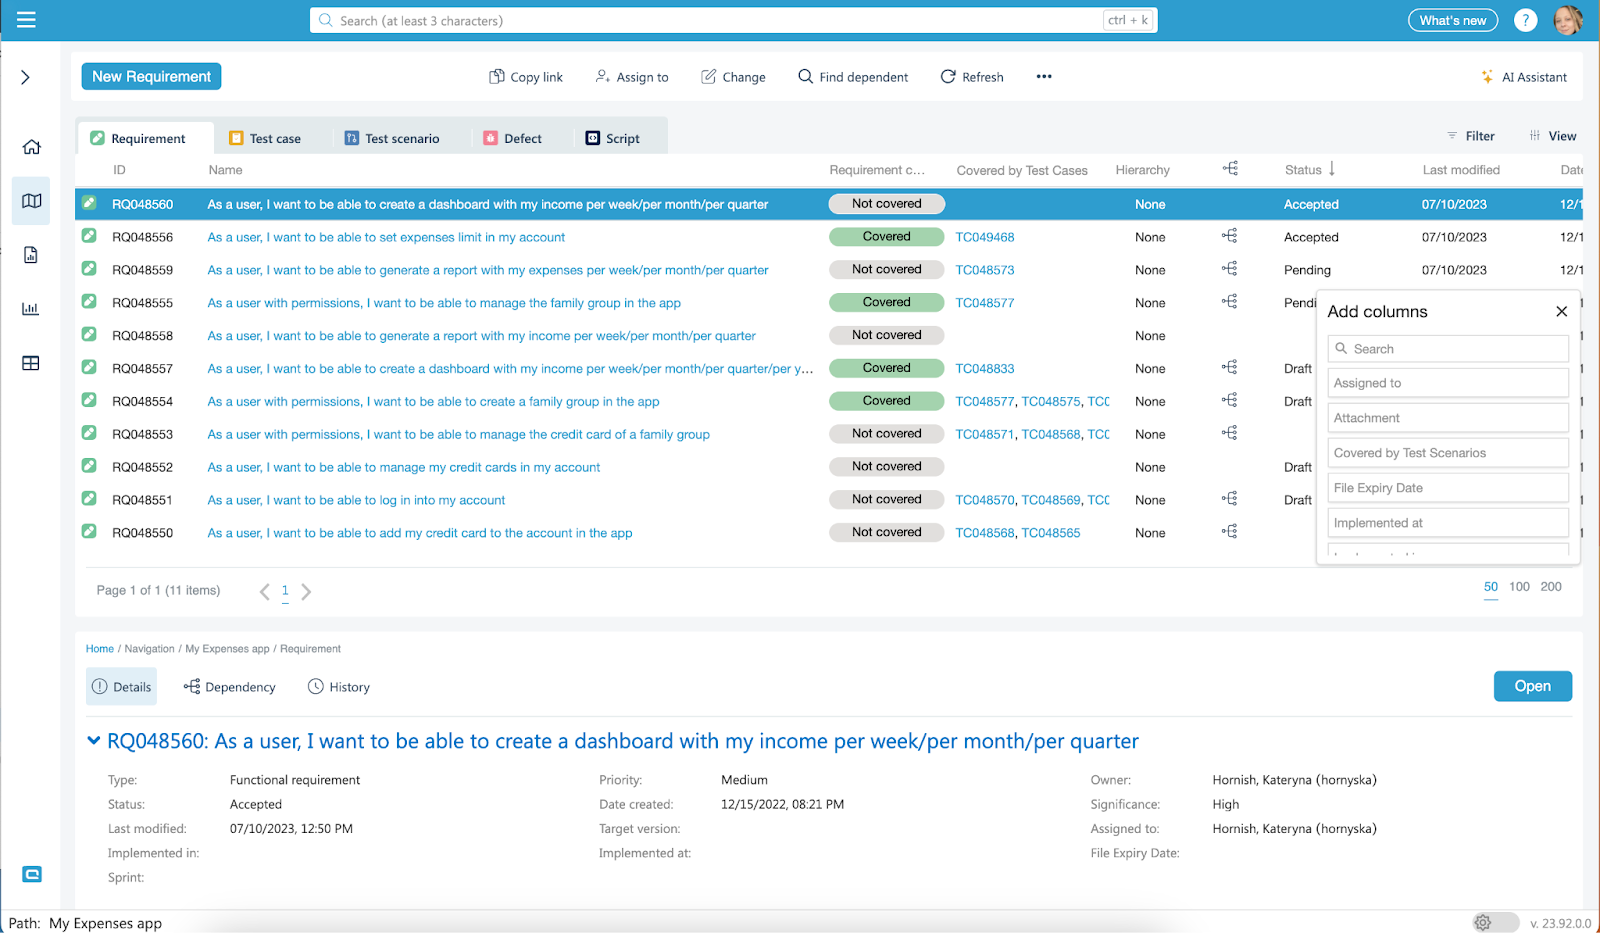
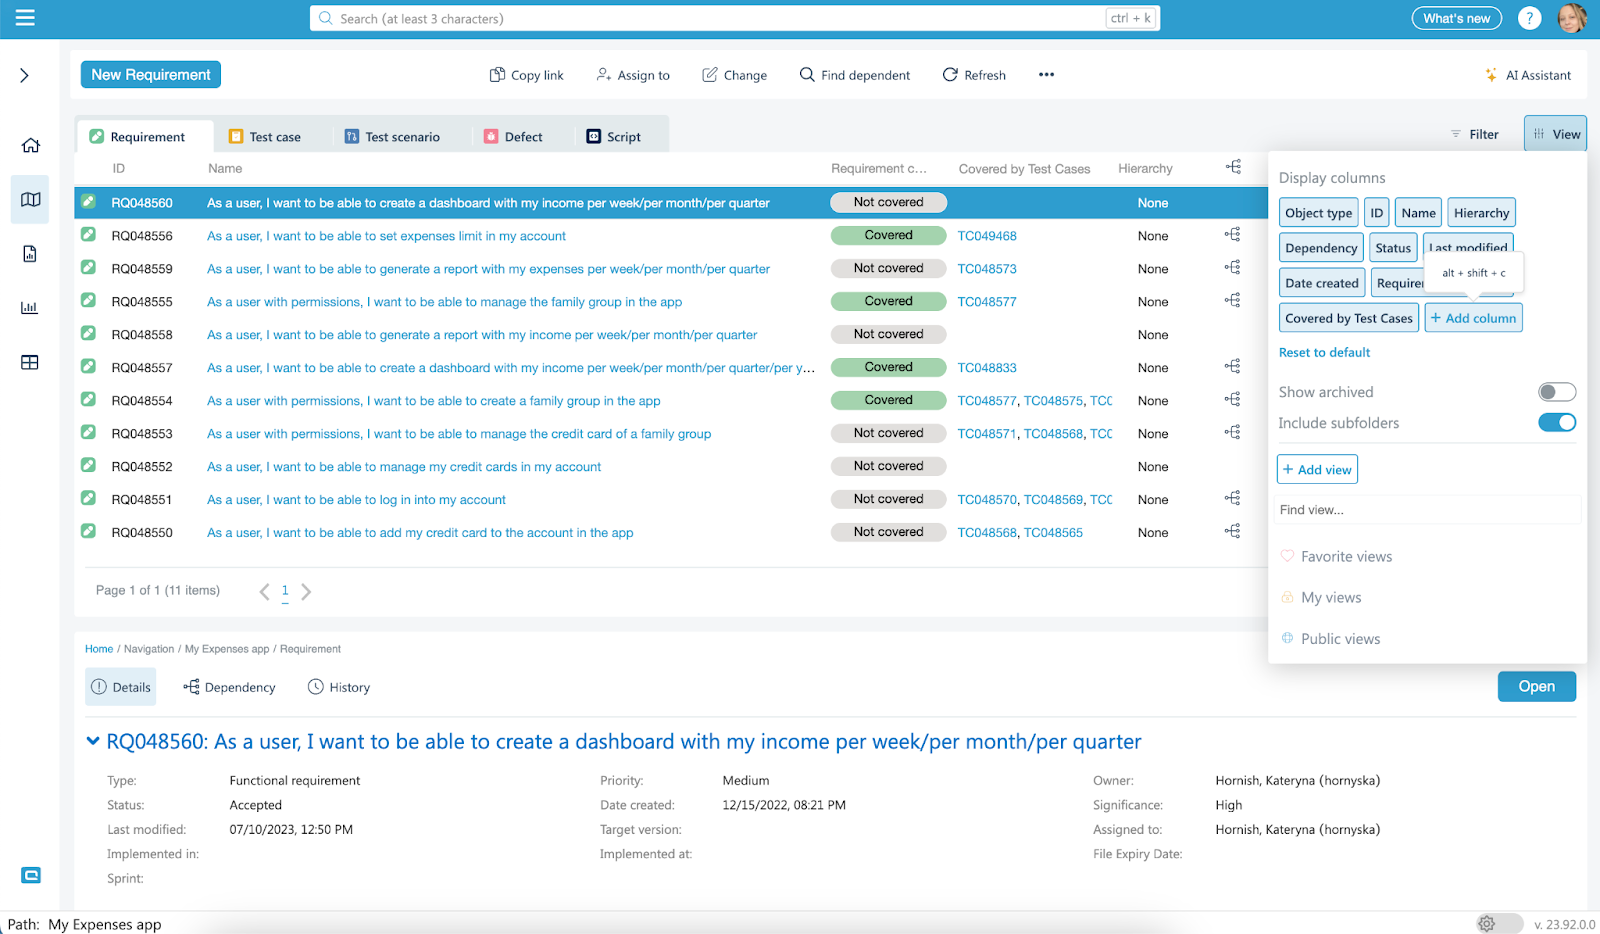
Whenever you need to drag and drop a new column to the grid, you can use the Alt+Shift+C shortcut . The column chooser will appear, and you can drag and drop items to the exact place on the grid.
Alternatively, you can easily see the whole list of the columns by enabling the ‘View’ sidebar and then clicking the ‘Add column’ button. The same column chooser will appear, allowing you to select data you want to display.
{% hint style="info" %}
In case you don’t have these feature guidelines at hand in the future, we got you covered. You can find all the information on the new features in our [aqua wiki](/documentation/web-client/getting-started.md).
We continue to make aqua beneficial and easy to use. The upcoming releases will bring both new powerful features and user experience improvements, and we can’t wait to share them with you.
In the meantime, let us know if you have any questions or share feedback at support\@aqua-cloud or
{% endhint %}
---
# Agent Instructions
This documentation is published with GitBook. GitBook is the documentation platform designed so that both humans and AI agents can read, navigate, and reason over technical content effectively. Learn more at gitbook.com.
## Querying This Documentation
If you need additional information that is not directly available in this page, you can query the documentation by asking a question.
Perform an HTTP GET request on the following URL with the `ask` and `goal` query parameters:
```
GET https://docs.aqua-cloud.io/documentation/product-updates-for-public-and-private-clouds-customers/product-updates/2023/23.92.0-public-and-private-clouds.md?ask=&goal=
```
`ask` is the immediate question: it should be specific, self-contained, and written in natural language.
`goal` is what the user is ultimately trying to achieve, the reason they need the answer. Sharing it helps GitBook give you a better, more relevant answer. A goal is most helpful when it describes the outcome the user wants rather than restating the question. For example, with `ask=how do I create an API token`, a goal like `automate deployments from our CI pipeline` lets GitBook tailor the answer to that use case.
The response will contain a direct answer to the question and relevant excerpts and sources from the documentation.
Use this mechanism when the answer is not explicitly present in the current page, you need clarification or additional context, or you want to retrieve related documentation sections.