Sync of the projects between aqua and Jira
You have successfully logged in into the Jira Sync tool.
Now you can either watch the video guide for setup or follow the step-by-step instructions provided below.
Let's create the first sync.
Click on the 'New sync' button

Right on the next screen click the 'Next' button.

Now we need to connect to Jira to get the projects and theirs configuration.
If you use Jira Server version, then:
Insert your Jira server URL
Provide Jira username and password
Test connection
If you use Jira Data Center version, then:
Insert your Jira server URL
Enable checkbox 'Use PAT'
Provide your PAT
Test connection
Read how to create PAT here: https://confluence.atlassian.com/enterprise/using-personal-access-tokens-1026032365.html
You can still use username and password, but for stable and optimal connection we recommend to use PAT

If you use Jira Cloud version, then:
Provide your public server Jira URL
Insert an email for the Jira technical cloud user
Add API key for Jira cloud user
Test connection
The API token can be obtained here: https://id.atlassian.com/manage-profile/security/api-tokens

Additional Jira Sync user (optional)
If you have some extra security requirements to have different technical users for the sync itself and configuration, you can use an additional technical Jira user to handle the configuration of the Jira (e.g. retrieve the Jira project settings and fields), which requires fewer permissions than the main configuration user. If you choose an additional sync user, ensure it has the minimal set of the following permissions to perform sync:
Create Issues
Edit Issues
Delete All Comments
Edit All Comments
Delete All Attachments

Once the connection to Jira is successfully established, click the 'Next' button and wait for the Jira sync to load all the necessary data. After the data is loaded, click the 'Next' button again to proceed.

On the next step, please select the Jira project and issue type you want to sync with aqua project.

Then select:
aqua project (or folder if you want to sync the specific folder only)
item type
technical aqua user ( the user that was created at the preparation stage with a technical Jira Sync license)

On the next step, Jira sync will automatically connect the projects and map the fields that you have pre-created on the initial set up stage for Jira ID and Jira Link.
No actions needed at this stage from your side, just click the 'Next' button once again to proceed.

Field mapping
On this step, you will see all aqua and Jira fields retrieved from both systems. Now you can map needed fields for the smooth sync.

Please note, Jira sync automatically maps the following fields and those can't be modified:
Status
Key
Updated
Read more in this section about all field types and special cases the Jira Sync Configurator supports.
The Jira Sync Configurator lets you choose the sync direction for a field from the following options:
aqua to Jira only
Jira to aqua only
Bidirectional
Values mapping
When you mapped all the fields, you can proceed with mapping the values for the fields or defines the special settings that described in this article.

Enabling sync
At the last step, please provide a unique sync name.

The define the sync direction. The Jira Sync supports the following directions:
from aqua to Jira
from Jira to aqua
Bidirectional

You can also set the sync interval. By default, it’s set to 30 seconds, but you can adjust it to as low as 10 seconds or increase it to suit your needs.
If you want to enable Sync later, then simply uncheck 'Start Sync' option and do it later.
If you are ready to do, simple click the 'Finish' button.
Check sync status in aqua
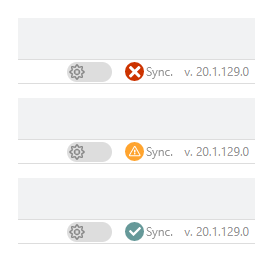
When your tickets in aqua are synced with Jira, then in aqua ticket you'll see the Jira ID and Jira Link in the corresponding fields. On top of that, at the bottom of the screen, you will see the status of the sync.
In aqua, the sync status is displayed in the path bar in the lower right corner of items that are synced with Jira. If you then click on the respective icon, you will be redirected to the history of the item, where you can see the details or the error message if synced failed.

Last updated
Was this helpful?